Friday, September 22, 2006

Fishing For Largemouth Bass


Micropterus salmoidesThe Official State of Florida Freshwater Fish is the Largemouth Bass species called Micropterus salmoides floridanus.


The species known as Black Bass include two of the most sought after sporting fish in North America….The Smallmouth and the Largemouth Bass.


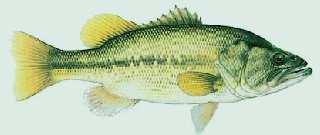
The Largemouth got its name because its upper jaw extends to behind its eye. Its coloring ranges from a dark or black back to green or olive-colored sides to a light belly. It has an uneven line of dark spots or bars that extend along its flanks to its tail. The spiny first dorsal fin is highest midway along its length and almost separated (forming a notch) from its soft second dorsal.


Largemouth Bass range from Minnesota to Quebec and south to the Gulf of Mexico. Originally a species of the southeastern US, it has been widely introduced elsewhere.
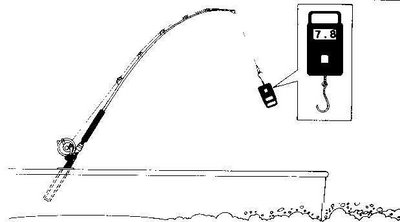
The northern largemouth seldom exceeds 10 pounds but the southern largemouth can exceed 20 pounds in weight. The IGFA all tackle record is 22 pounds 4 ounces caught in Georgia. Florida’s certified state record is 17.27 pounds.


Black Bass are the most sought after freshwater fish because of their wide range and their aggressive bone jarring strikes and the strength they exhibit during the fight. Being active predators they feed on a large variety of creatures and can be tempted to strike at practically any kind of bait or lure, either natural or artificial. Artificials could include plastic worms and grubs, spoons, spinners, crank baits and plugs. For bait fishing you could use worms, crayfish, leeches or minnows. The fly fisherman could use a variety of artificials such as bugs, streamers, poppers and bucktails.


Tackle for fishing with lures could include a 5-1/2’ to 7 ‘ spinning or baitcasting rod and reel with 6 to 12 pound monofilament. Fly fishing tackle could include a 7’ to 9’ bass fly rod with fast taper fitted with a fly reel fitted with a #7 to #9 floating line and a 6 to 8 pound leader.

Care Of Fishing Rod Guides


The guides on your rods must be checked and kept free of any abrasive areas. Pull a strip of pantyhose through the rod guides to check for snags, or a cotton tipped swab. Saltwater will wreak havoc with roller guides. Inspect them before and after each trip. When trolling, make sure the line is not wrapped around a guide. Pay close attention to you rod guides, they are very important, and if they get damaged or abrased you must replace it or it will break your line!

Fishing Tips


Tip: Monofilament can be damaged by excess exposure to direct sunlight. Keep your equipment in a dry, shaded area. Fishing on a hot summer day is fine. Keeping your rods in a hot car trunk, or exposed to direct sunlight in the back seat, is not recommended.

Tip: Always use a well balanced outfit. This means the rod, reel, line and lure should be made for each other. Do not load a light outfit with a heavy line. Conversely, do not throw a huge lure with a light outfit.

Tip: More rods are broken in car doors, house doors or through poor storage. Do not let rod tips bang all over your boat.

Tip: Always rinse rods with freshwater. Periodically remove reels and lubricate reel seats with CRC-6-56.

Tip: Remember, proper maintenance, balance, storage and handling are imperative in taking care of the equipment that takes care of you.

Tip: Store all bulk line in a cool, dark place. Direct sunlight will damage monofilament over a period of time.

Protecting Your Fishing Line


Considering the expectations of monofilament fishing line, and the abuse it's subject to, it is amazing what this "thin" material will do. But, to get the most out of any monofilament, we must protect it from certain negative elements. Listed below are a few "mono checks" that, when followed properly, will put more fish on the table. We will start with the reel and work towards the hook.
Always store line in a cool dry place. Always check the line for nicks or frazzles or areas of abrasion that will cause a weakness. After every fishing trip, or after playing out a nice fish, cut off approximately ten feet of line and retie, if you have reason to believe it may have been frayed. This is very important. When fighting a decent fish, in fresh or saltwater, three things can happen: (1) the fish goes deep, pulling the line across rocks, logs or other hard objects, (2) the fish is big and the line will rub across its body or tail, and (3) other things, such as the boat, a jetty, surface objects or dock, or even other fish inthe area, may bump into your line. All three factors will cause abrasion, eventually prompting the line to break. The easiest solution is to cut off the weak line and retie. Quality monofilament that has not come in contact with the above items does not need to be totally replaced. (We have had saltwater charter boat captains catch over 20 Blue Marlin without respooling new Ande monofilament.) So, if you check your reel's drag system, your rod guides and cut away line that may be damaged, we guarantee you will catch more fish. Take the time...it is worth it.

Putting Monofilament Line On Your Fishing Reel
Most tackle stores are happy to spool up your reel, particularly those who have a line winding machine. If you have the time, and they have the quality line you want, let them do it. When you're spooling up a bait casting reel, or any conventional reel, put a rod, or even a pencil, through the center of the line spool. Tie the line to the reel with a (Uni-knot or Arbor knot) clipping off the tag end. Snug the knot to the reel spool. One person should reel while another holds both ends of the rod, applying pressure as the line is reeled onto the spool. Fill to about an 1/8 inch from the spool's outer rim. Keep the line away from anything that could cause abrasion. Use the same procedure with a spinning reel, but reel line so that it comes off the end of the spool. After 15 or 20 turns, if a twist occurs, turn the spool over and continue to fill the reel. Monofilament will twist. If it happens while fishing from a boat, play the line out with nothing on the end, trolling behind the boat for about five minutes. It is also important to always use a ball-bearing swivel, which will reduce or eliminate line twist. Certain lures or bait tied directly to the line will invite twist. To compensate for this, try lighter line. Just for your own education and enjoyment, go down in line test. You will be surprised that you can catch big fish on line much lighter than you are presently using. It may take more patience and even a little more skill, but you will enjoy it. If fish stop biting, go to a lighter test. The thinner line may get them eating again. The thinner the line, the less likely a fish sees it.

Setting The Drag On Your Fishing Reel

Setting The Drag On Your Fishing Reel


Set the strike drag with the rod securely in a holder. The scale should read between 25 and 33 percent of the unknotted line strength when the drag starts to slip. 30-lb test line (shown above) should have a strike drag setting of between 7.5 and 10 pounds.

If you set the drag on a light-tackle outfit (12-pound test is illustrated above) with the rod tip pointed at the scale (top image), the reading should be about 15 percent of the unknotted line strength. When the rod is in the fighting position (bottom) friction will increase the drag.


Setting the Drag on a Lever Drag Fishing Reel


Properly setting the drag on a fishing reel is one of the most important things you can do to insure landing that fish of a lifetime.
On lever drag reels there are two drag settings we need to concern ourselves with, strike drag and full drag. The strike drag setting needs to be high enough to prevent backlash on the reel and below the point where the initial strike force or inertia exceeds the breaking strength of the line.
To properly set the strike drag, the conditions of the real fish strike should be simulated as closely as possible. There have been many discussions on the proper setting of strike drag on a fishing reel. For our discussion we will assume it should be somewhere in the range of 25% to 35% of the rated line breaking strength. (I.e., 30# line should have a strike drag setting in the range of 7-1/2 pounds to 10-1/2 pounds.)
The reel should be filled with fresh line within 1/8" of the shoulder of the spool flange. It shall be mounted on the rod it is to be used with and have the line running through the guides. The rod should be placed in a rod holder or held at a 45-degree angle. You will need a scale of the type that records the highest tension achieved, such as a Manley or Chatillion brass tube scale. Let out enough line so that any leaders, swivels or knots are beyond the guides and attach the scale to your line. Check to see the telltale marker on the scale is set to 0 pounds.
Pull down and away from the rod as quickly as you can to simulate the action of a striking fish.
Read the scale and adjust the drag on the reel according to the manufacturer’s directions. Reset the scale and re-test using the same technique to check the new setting. Continue this process until the desired setting (25% to 35% of rated line breaking strength) is reached.
Full drag will be set in the same manner as the strike drag was described
The full drag setting on the reel is usually set at no more the 50% of rated line breaking strength. (I.e., 30# line should have a full drag setting in the range of 15 pounds.)
Full drag should only be used to put additional pressure on a tired or mostly subdued fish. If you do use the full drag position and the fish suddenly decides to make a run quickly return the drag to the strike position to prevent a break off.

Removing Gut Hooks From A Fish

Removing Gut Hooks From A Fish
(1) With the hook in the gullet, note which side of the fish's mouth the hook shank is toward. Note: For illustration sake, the line is eliminated here in steps 2 through 5. In reality, the line stays connected as this technique is performed.

(2) With a finger or two, reach in through the last gill arch on that side of the fish and push and pull down on the hookeye so the hook turns and . . .
(3) rolls out below the gill toward the side of the fish. At that point, amazingly, the hook, barb and all, almost always pops free from its hold in the fish's gullet.
(4) Reach into the fish's mouth and grip the bend in the hook (which is now up) and . . .
(5) lift it free. If the fish's mouth is too small to reach in with your hand, use a needle-nose pliers to grip the hook bend. This is a great thing to know. I found this info on infisherman a very informative fishing site.

Fishing Hook Removal


Fishing Hook Removal

Removing a hook embedded over the barb, but not back out through the skin, is relatively easy:
1. Make a loop about 10cm (6") long, in strong line, 10kg (20lb) plus, and pass it over the eye of the hook, and then up to the top of the bend of the hook.


2. Push firmly down on the eye of the hook so the eye of the
hook touches the skin.


3. FinallyWith a sudden, strong yank on the line loop, pull up and away from the hook-eye. The hook should come out the way it went in, and because it will curve out the same way it went in the barb should not catch.

ImportantIt is very important to follow 'Step 1' to the letter if pain and discomfort is to be avoided. Most importantly the loop of line must be at the top of the hook bend, and the pull must be up and away. Way too many articles on this method advise having the line at the back of the bend, and pulling straight back - this will only result in the barb catching and causing pain.

Improved Clinch


Improved Clinch Fishing Knot

Step One
Take the tag end and pass it through the eye of your terminal tackle, allowing at least 3 inches of tag beyond the eye. Wrap the tag end five to seven times around the line going to your rod.


Step Two
Pinch the coils you created with your thumb and forefinger. With your other hand, run the tag end through the first loop above the eye, then over the coils and through the large loop you just created.


Step Three
Always wet the knot area. Grab the tag end and the line going to your rod and pull simultaneously, forcing the coils to form a tight spiral. Once tight, slide the tightened coils against the eye of the terminal tackle with your fingernail and assure the coils are in a uniform spiral, not overlapping each other. Clip the tag end.

Sunday, September 17, 2006

Connecting Line to line Fishing Knots

Connecting Line to line Fishing Knots

Berkely Braided Line Fishing Knot

Berkely Braided Line Fishing Knot

King Sling Fishing Knot

The King Sling Fishing Knot

Specialist Fly Fishing Knot


The Specialist Fly Fishing Knot
This fishing knot is for all of you fly fishing guys out there!

The Uni Knot

The Uni Fishing Knot
The Uni Fishing Knot is very simular to the Trilene and Improved Clinch.

Snell Fishing Knot

Snell Fishing Knot
The Snell Fishing Knot is a great knot to use and is very strong.

Saturday, September 16, 2006

The Trilene Fishing Knot

TRILENE FISHING KNOT

The TRILENE FISHING KNOTis another one of my favorites and is a strong reliable connection that resists slippage and premature failures. The Trilene Knot is an all-purpose connection to be used in joining monofilament to swivels, snaps, hooks and artificial lures. Also a great knot for live bait. This fishing knot's unique design and ease of tying yield consistently strong, dependable connections while retaining most of the original line strength 80-90%. The double wrap of mono through the eyelet gives an extra protective cushion. Always wet the knot before tightening!


1. Run the end of line through eye of hook or lure and double back through the eye a second time.


2. Loop around the standing part of line 5 or 6 times.


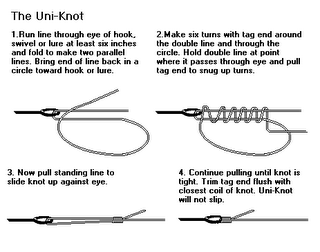
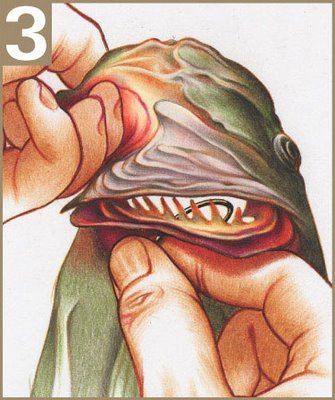
3. Thread the tag end back between the eye and the coils as shown. Always wet the knot!


4. Pull up tight and trim the tag end.

Re-tie fishing knots after every Fish or Snag for extra security


This is my Favorite Fishing Knot to use. The Palomar Knot is the Strongest Fishing Knot Around. I recommend this knot for live bait and some articial.


Always Be sure to lick your knot, This is an old pro trick, it keeps the knot from getting any friction while tightening, and prevents the knot from breaking easily.

Fishing Knots

The fishing knot, just like fishing is an art its self. Tying Fishing knots must be done correctly, and many beginners don't realize how critical they are. Every knot you tie holds the fate of your fish. If you tie one improperly or tie the wrong knot all together it will fail every time you need it to hold up. That is why I created this page so that you can learn how important your fishing knots are!

I've created a guide so that you can learn how to tie each fishing knot correctly.